Combo Amp Attenuator Insert
Overheard at a wanna be rockstars house:
Man practicing Cat Scratch Fever on a cranked Twin Reverb. Suddenly, his wife appears.
Wife: "Hey!!! Turn that damn thing down!!! I'm trying to watch Oprah!!"
Husband: "But Snookums, I'm learning this to play this song for the Ted Nugent look alike contest at the Motor City Madman convention this weekend, and I have to crank the amp to do it!!"
Wife: "Don't you "Snookums" me, Buster!!! If you don't turn that noise down you'll be playing with yourself in the guest bedroom tonight!"
Wife stomps upstairs.
Husband to self: "Oh woe is me!!! What am I to do? I need to hook an attenuator to my amp but I can't because it's a combo amp!! I guess there'll be no love for me tonight!!
Never fear, Coyne Operated Electronics is here!!! I just can't let a man be with out the love of his Snookums, so here is a solution to the combo owners attenuator dilemma.
This simple mod will allow you to quickly and easily hook up an attenuator to your combo amp. It will work with pretty much any combo amp that has a removable back panel, like Fenders, and the mod is easily done. In the pictures here the amp is my Traynor YGM-3A. You can modify the actual panel itself but it's best to remove the old panel and craft a new one so you can put the amp back to stock if you want to. If it is vintage amp, making a replacement panel rather than cutting the old one is mandatory!!
Here is the parts list:
- Chunk of 1/4 inch plywood, or whatever the thickness of the old panel
- Two 1/4 inch shorting jacks, Switchcraft 12A, Mouser 502-12A
- One 1/4 inch plug
- Jackplate for two 1/4 inch jacks Parts Express #260-287 or equivalent
- Male/Female Molex connectors Radio Shack #274-154 and 274-151
- Wire, Tolex, etc.
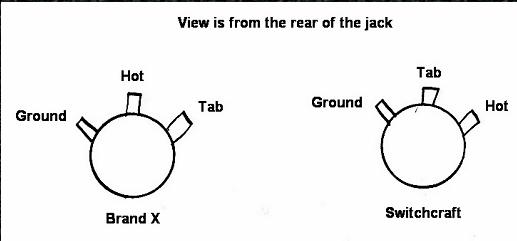
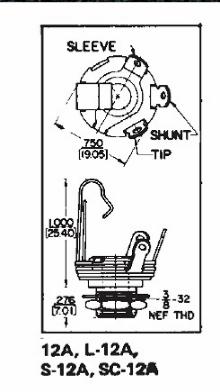
If you DO use off brand jacks, be aware the pinouts can be different from the Switchcraft version. Here is a diagram I made showing the difference between the two and the pinout I copied from the Switchcraft 12A datasheet.
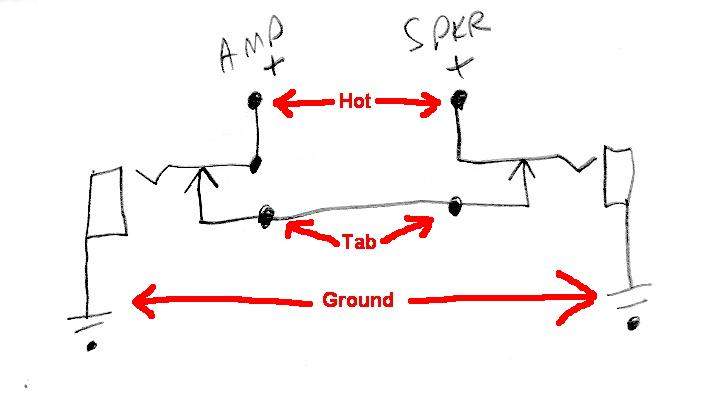
Ok, here is the schematic. What is happening here is that when there are no cables plugged in, the the signal goes to the tip connection of the amp jack, through the tab which is connected to it, to the tab on the speaker jack, which is connected to the tip, and on to the speaker. When you insert a speaker cable into each jack and connect the attenuator, it interrupts the tab connections and sends the signal out to the attenuator from the amp jack and back to the speaker via the speaker jack. I've labeled the various contacts to show which tab on the jack is connected to what. Also be aware that all the grounds must be connected together or the insert will not work. What I do is twist all the grounds together and solder and shrink wrap them.
Here is the amp prior to the mod with the original backplate.
Here is the old backplate along with the new one I cut. The new backplate is the same size as the old one with the addition of an expanded area to accommodate the jackplate. I cut the hole with a hole saw in my drill. I had some tolex left over from another project and covered the new backplate.
In most combo amps the speaker is connected to the amp via a plug/jack arrangement, for instance in Fender amps. You want to be able to remove the new backplate completely from the amp when necessary, for instance when the amp needs servicing or new power tubes need to be biased. This Traynor originally had an RCA jack and plug, and I changed them to a more conventional 1/4 inch jack and plug. To allow disconnection of the speaker lead I put Molex connectors inline with the speaker wire.
In most combo amps the speaker is connected to the amp via a plug/jack arrangement, for instance in Fender amps. You want to be able to remove the new backplate completely from the amp when necessary, for instance when the amp needs servicing or new power tubes need to be biased. This Traynor originally had an RCA jack and plug, and I changed them to a more conventional 1/4 inch jack and plug. To allow disconnection of the speaker lead I put Molex connectors inline with the speaker wire.
Here is the new backplate with everything installed and wired up. Note the ground wires that are connected and shrinkwrapped, the plug that goes to the amp and the Molex connector that goes to the speaker.
Here is a closeup of the Molex connector leading to the speaker. I removed the old wiring harness and replaced it with 16 gauge wire I twisted myself.
Here you can see the jackplate connected to the proper areas on the amp.
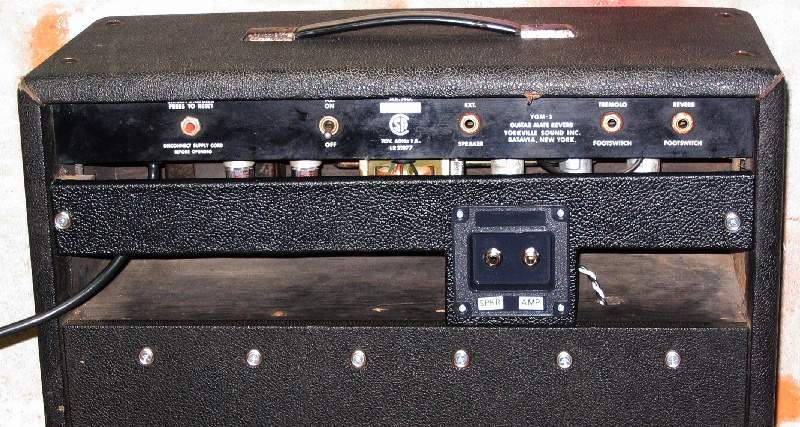
Here is the new backplate with the insert installed. Make sure you label which jack is which!!! In this case here the labeling is SPKR=To Speaker and AMP=From Amp.
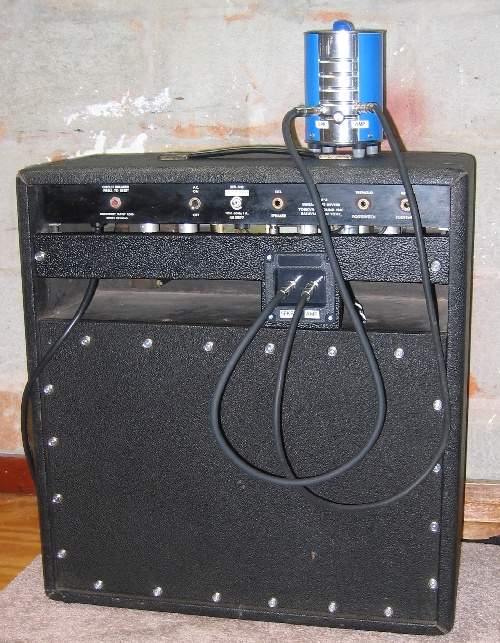
And here is the amp with my Ampwell House Attenuator hooked up. An added advantage of this setup is that you can easily connect the internal amp to an external speaker, or the reverse: Connect an external amp to the internal speaker of the combo amp!!
Build one of these, and get some lovin' from your Snookums!
Build one of these, and get some lovin' from your Snookums!