The Ampoline Guitar Amp Attenuator
I was talking to my friend Geoff and he was wishing he had an guitar amp attenuator like mine, either the Power Soaks or the Ampwell House, for his Victoria 30 watt tweed Bandmaster. So, I constructed this with parts I had around my shop for him. I wanted to build it with what I had on hand and didn't want to spend any more money than I necessary. I had the parts for a 4 ohm -6db attenuator, so that's what I built.
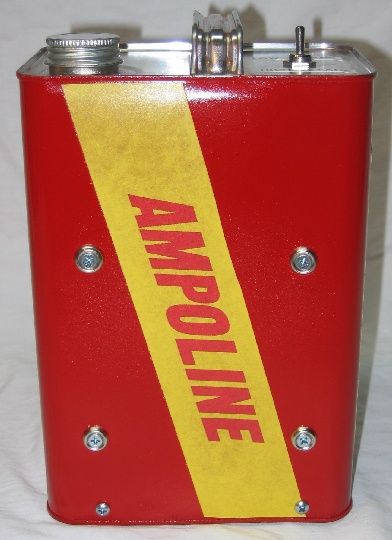
I built my first DIY L-pad guitar amp attenuator in a coffee can, calling it my Ampwell House Attenuator. I call this one my Ampoline Attenuator. It is a simple -6 db L-Pad power soak I'm rating at 75 watts total power with the fan running. Be aware that means peak, total power and not RMS power. When dimed a tube amp can put out 30 to 50 percent more of the RMS power rating of the amp, so don't run a 75 watt RMS amp into this attenuator!
Once more I apply a sense of humor towards the design and made it look like a gasoline can. The total cost was about $30 including the purchase of some paint and nuts and bolts at the hardware store.
I'd had the can for some time, I got it from a surplus store for a quarter because it didn't have a cap, which I pilfered from another can in my workshop. I got the resistors and other parts from Ted Weber and used his L-Pad calculator to figure the values. Each resistor is rated at 50 watts, and there are two per section, supposedly giving it a 100 watt rating. When I breadboarded it and tested it with a 40 watt Pro Reverb dimed for about 20 minutes, they got really hot, a little too hot for comfort, so I emailed Ted Weber for advice about the wattage rating on the resistors. This is what he replied:
"Resistors de-rate in power rating as they heat up. So, it's a pig in a poke... They rate them at, say, 50 watts, but only if they stay a certain temperature and won't increase to another certain temperature. So, you will need to mount it on a steel plate or other heatsink to help get the heat out of it."
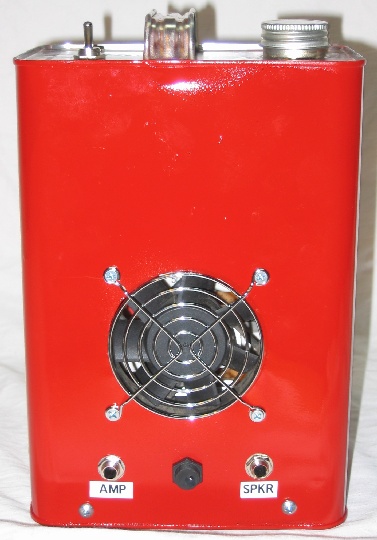
So, I attached heat sinks and installed a 12 volt fan and both of those help to keep things cool. I cannibalized the fan and heat sinks from a couple of old computer power supplies. I glued the heat sinks to the resistors with thermally conductive glue I got at a computer store, and run the fan with a 9v power supply I had in my junk box. I experimented with treble bleed caps but at only -6 db attenuation there was little or no difference in tone so didn't put it in the final version.
I built my first DIY L-pad guitar amp attenuator in a coffee can, calling it my Ampwell House Attenuator. I call this one my Ampoline Attenuator. It is a simple -6 db L-Pad power soak I'm rating at 75 watts total power with the fan running. Be aware that means peak, total power and not RMS power. When dimed a tube amp can put out 30 to 50 percent more of the RMS power rating of the amp, so don't run a 75 watt RMS amp into this attenuator!
Once more I apply a sense of humor towards the design and made it look like a gasoline can. The total cost was about $30 including the purchase of some paint and nuts and bolts at the hardware store.
I'd had the can for some time, I got it from a surplus store for a quarter because it didn't have a cap, which I pilfered from another can in my workshop. I got the resistors and other parts from Ted Weber and used his L-Pad calculator to figure the values. Each resistor is rated at 50 watts, and there are two per section, supposedly giving it a 100 watt rating. When I breadboarded it and tested it with a 40 watt Pro Reverb dimed for about 20 minutes, they got really hot, a little too hot for comfort, so I emailed Ted Weber for advice about the wattage rating on the resistors. This is what he replied:
"Resistors de-rate in power rating as they heat up. So, it's a pig in a poke... They rate them at, say, 50 watts, but only if they stay a certain temperature and won't increase to another certain temperature. So, you will need to mount it on a steel plate or other heatsink to help get the heat out of it."
So, I attached heat sinks and installed a 12 volt fan and both of those help to keep things cool. I cannibalized the fan and heat sinks from a couple of old computer power supplies. I glued the heat sinks to the resistors with thermally conductive glue I got at a computer store, and run the fan with a 9v power supply I had in my junk box. I experimented with treble bleed caps but at only -6 db attenuation there was little or no difference in tone so didn't put it in the final version.
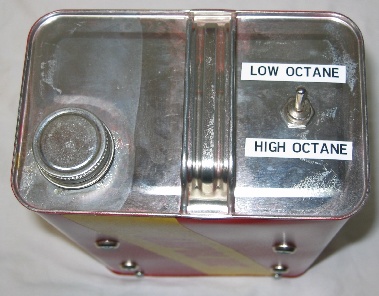
On the right is the bypass switch:
Low Octane = Attenuated
High Octane = True Bypass
The screw cap on the left must be removed during use to allow air blown in by the fan to exit.
Low Octane = Attenuated
High Octane = True Bypass
The screw cap on the left must be removed during use to allow air blown in by the fan to exit.
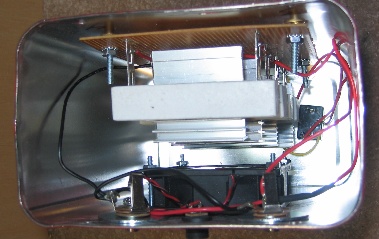
Here is an interior view. It was real tricky to get the board and fan mounted, I had to hold the nuts with needle nosed pliers to thread them.
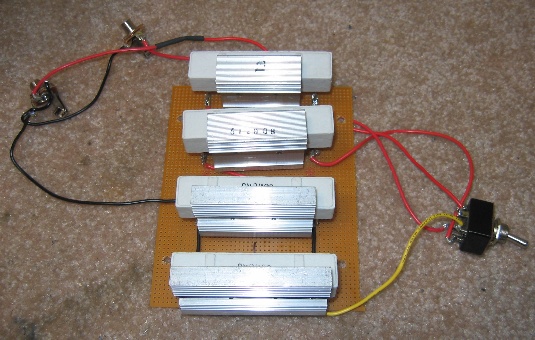

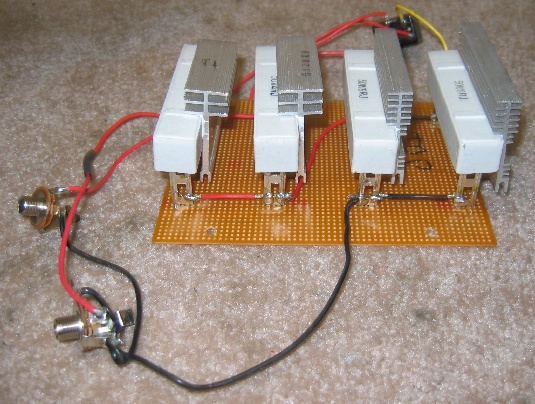
Here are a couple of views of the wired circuit outside the can. I had several old computer power supplies (Great source for parts!!) in my junk box, and pulled the heatsinks from them. They are glued to the resistors with thermally conductive epoxy used for computer CPU's.

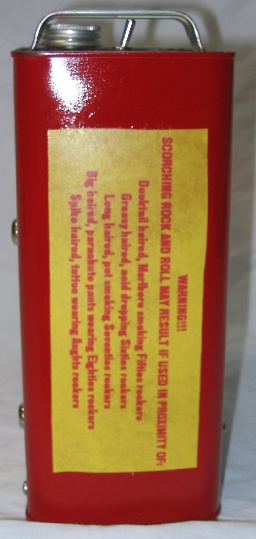
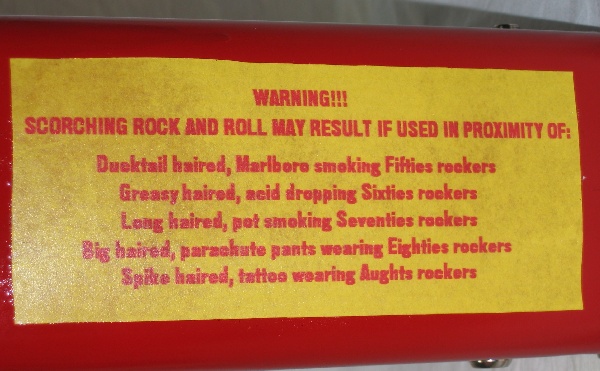
Check out the warning label!! I meant to put something in about angst ridden, flannel wearing ninties rockers but was in a hurry to finish the project and forgot.
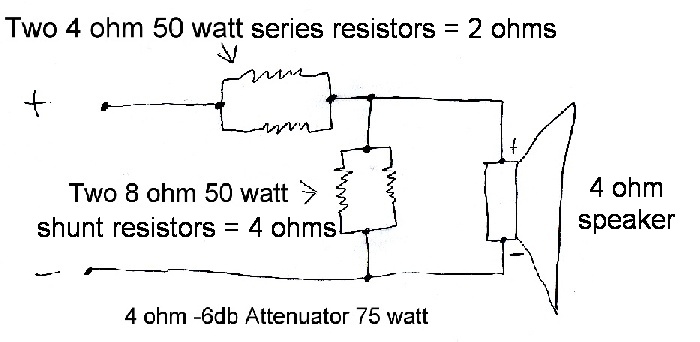
Here is the basic schematic. A -6 db, 4 ohm L-Pad requires a 2 ohm series resistor and an 4 ohm shunt resistor. Two 4 ohm 50 watt resistors were used for the series resistor and two 8 ohm 50 watt resistors were used for the shunt resistor to achieve a better power handling capacity. A link to a schematic/diagram of the L-Pad with the bypass switch is below.
I realize this gadget is a little limiting by only having one attenuation setting, but as I said it was built with parts on hand. It can be useful for practicing with your band at a lower volume, or at a gig where the owner is bitching about the band being too loud. That's happened to me a lot.
If you wanted to build an attenuator with a different impedance or different volume reduction use this sites L-Pad calculator to get the necessary values. If you wanted more than one selection you could build two -6 db attenuators and cascade one into the other (There are commercial attenuators like that, it's easy to do) or maybe figure out how to do a stepped switch with multiple choices like the commercial products. Or, cascade a fixed attenuator into a variable attenuator like the Ampwell House so it would take more power. There are lots of ways to implement this, from simple to complex.
About the enclosure, I drilled the holes very carefully because the thin metal of the can would tear easily with a big bit. I started with small bits and enlarged them, then smoothed them out with a grinder bit on my Dremel tool. The hole for the fan was cut roughly out by a metal nibbler, then shaped again with the Dremel tool. I painted the can with Krylon from the hardware store and did an Internet search for pictures of an old style gas can to use for ideas about the font and layout. I created and printed the yellow part with text on my printer using some photo manipulation software I have, and used spray adhesive to attach it. I finished up with some clear lacquer over everything. You certainly don't need to use such an unconventional enclosure, or you can do me one better and thing of something else unusual.
It's very important you use good jacks for this project, and that means Switchcraft. Reliable jacks are a must because if they fail your amp will be running with no load until you notice and shut things down. See the schematic for part numbers.
Here is the schematic/diagram of the Ampoline Attenuator with parts and build suggestions.
Check out my Ampwell House Attenuator, built in a coffee can!!
Check out my Havanatone Attenuator, built in a cigar box!!
Check out my Coppertone Attenuator, built in a computer power supply case!
My Bohemian Rhapsodyne Attenuator for my Vox AC30CC!
My Altone attenuator for small amps, built in an Altoids tin!